Optimise your packing table in 3 steps
6min read
20/12/2021


An online shop without a packing table is like an engine without fuel. Whether you are a small start-up or a large international online shop, the packing table is an essential link in your logistics. That’s why we explain below in 3 steps how to set up a packing table in a smart and ergonomic way. This will save you time, money and make the work of your packers (even) more enjoyable.
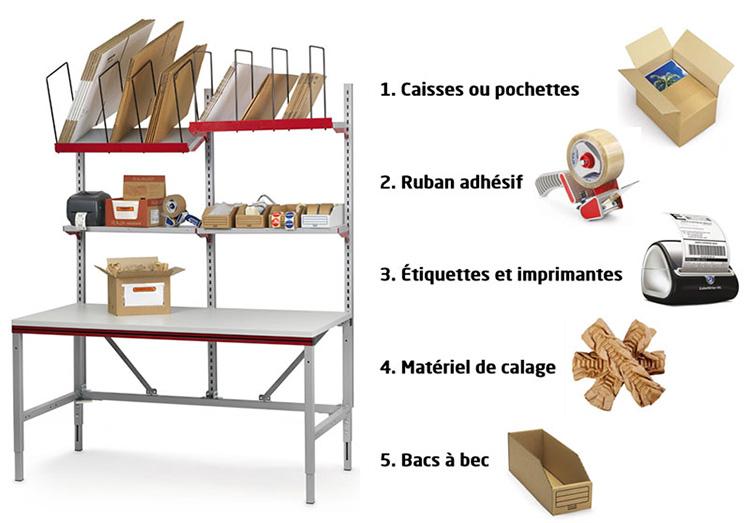
Every online shop is unique and different because of its product range. In many cases, these differences are reflected in the packing table. Therefore, equip your packing table with tools and packaging according to your products. The focus here can be on very large (or exceptionally small) products, fragile goods, special formats, etc. We list the most popular packaging tools below, according to their use:
| Indispensable |
Frequently |
Occasionally |
| – Shipping crates, pouches or bags – Adhesive tape + dispenser – Labels + printer – Cushioning: cushioning paper or particles, air cushions, etc. – Spout bags |
– Protective material: wrapping paper, bubble wrap or foam – Sticky paper – Scissors or cutter – Waste bin – Bar code reader – Writing materials <Packaging for exceptional sizes (extra flat or long boxes, tubes, etc.) - Stapler for cardboard - Stretch film roll - Elastic bands - Parcel scales |
 Tip!” Limit the number of case sizes in stock. Choose a variable height case: it can be adjusted to 12 heights, allowing you to pack different products with one type of case.
Tricks! paper, bubble wrap or foam? Choose the right cushioning and protective material for your products. This way, you can be sure that your shipment is as safe as possible, without breakage or damage.
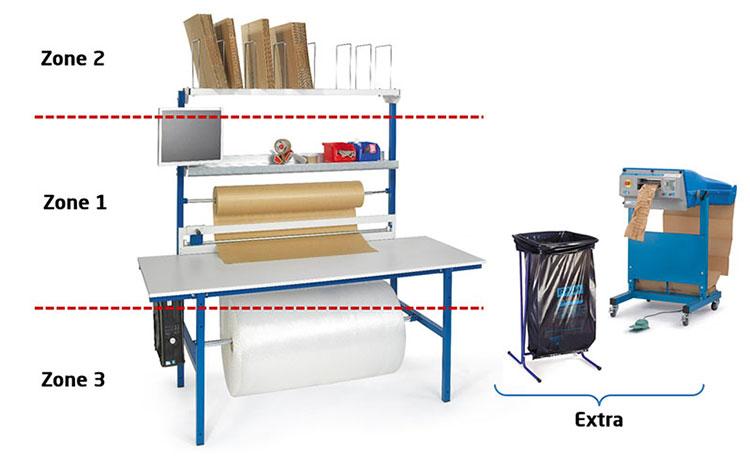
When you have the tools and packaging you need, you can move on to step 2. This involves giving each tool its ideal place on the packing table. The main thing here is that your packers can work quickly and efficiently. The most frequently used materials should always be within reach. To this end, we divide the table into three areas:
Tip!” A packing machine does not have to be large or heavy. There are very compact models, such as the Geami WrapPak® (for paper) or the AirFirst® (for air cushions).
When setting up and designing your packing table, it is important to always keep the concept of ergonomics in mind. As you probably know, a poorly equipped workplace can be a source of musculoskeletal disorders (MSDs). Think of hunched shoulders, back or leg pain, etc. In this third step, we’ll look at ways to set up the packing table correctly so that it’s comfortable for the packer to use.
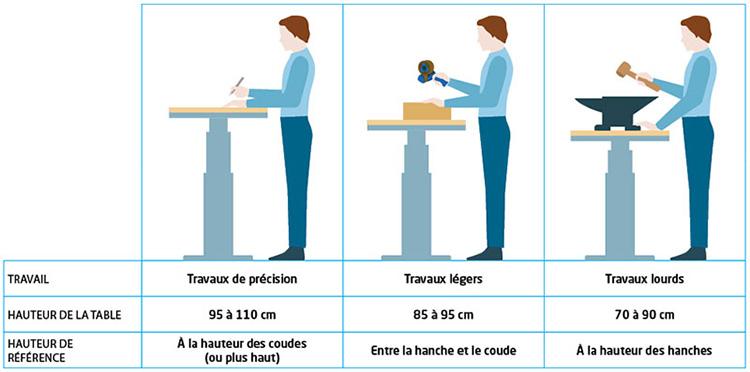
Let’s start by setting the working height. It is best to follow the guidelines in the'image below. Packaging is generally considered “light work”, which means a height of about 85-95 cm for the work surface. As a reference measurement, use the height between the hips and elbows.
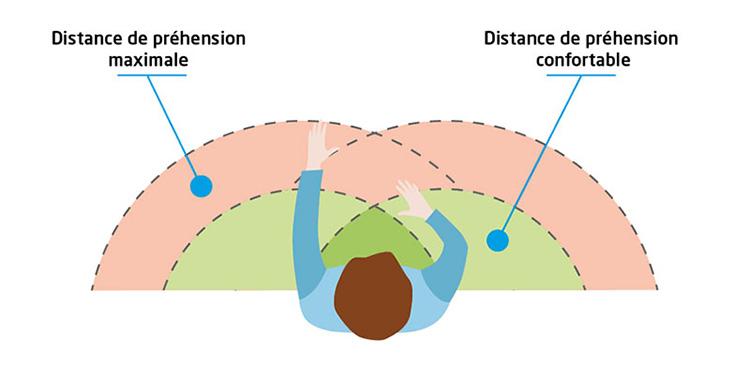
The most common tools should always be within reach. This avoids having to bend over and stretch the back, neck and arms too far. In the figure below, the “comfortable gripping distance” is the location of the materials you use most often. This is approximately the distance between the wrist and the elbow. Then there is the “maximum grip distance”. This is the distance from your wrist to your shoulder (when you stretch your arm). You can put the less frequent materials here.
.
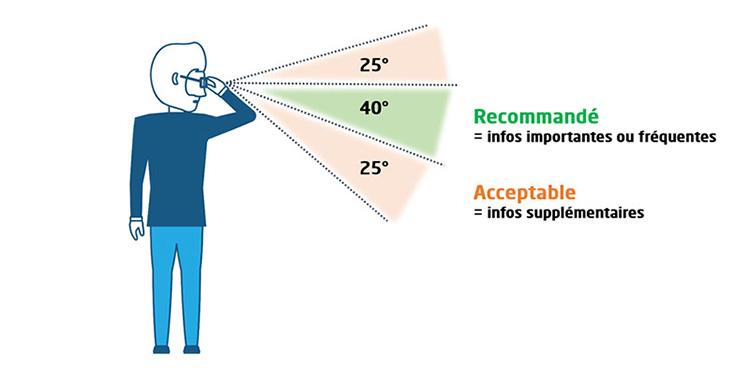
A cheatsheet with packing instructions or a screen with order information: they are often a very handy asset for those who want to fill their orders smoothly. Where is the best place to “see” this information? This depends on the field of vision and its horizon line. Important or frequent information is best viewed at an angle of 40°. In an enlarged angle of 25° at the top and bottom, you can place additional information. In this way, the packer doesn't have to bend his neck too far and can avoid the risk of RSI.
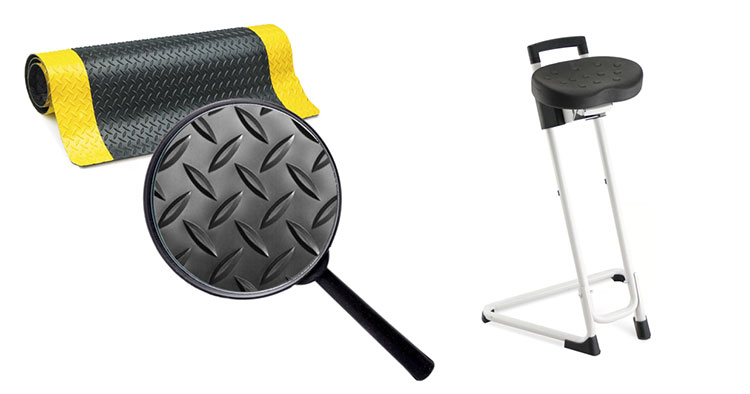
Taking sufficient breaks for walking, alternating between standing and sitting work, etc. are simple ways to encourage movement. These are simple ways to avoid many MSDs. At the packing table, the seat-stand is a useful tool in this regard. It makes it very easy to change the sitting position (standing or not). In addition, this chair allows the packer to always work at the right height, which prevents the back from being too bent or inclined.
A second tool you should definitely get is the “anti-fatigue mat“. Very ergonomic, this mat avoids monotonous work while standing. The mats have a grooved structure with studs. These subtly create an uneven surface that requires the feet and legs to move constantly in order to maintain balance. This stimulates blood circulation, which can also prevent RSI.